
Ladybird IoT | LinkedIn Ladybird IoT | Website


Ladybird IoT FAQ.
This Knowledge Base document is where we create factual FAQ support questions and answers for the support for the Ladybird IoT product currently available and for future IoT products manufactured under the same brand name.

Ladybird IoT Frequently Asked Questions.
Q: What is Ladybird IoT Environmental Monitoring?
A: The Ladybird IoT system is built around our proprietary long-range, wireless-connected climate sensor, which can be attached to other sensors.
-
Sensors are easy to install and maintain, and when changes need to be made, they can be easily moved to monitor conditions exactly where you need to.
-
The low price point and wide range of accessory sensors make adding components to the system easy and affordable when required.
Q: Why choose Ladybird IoT?
A: Long Range Connectivity - Our sensors can wirelessly connect to a central gateway over distances up to 10km, without needing a SIM. This minimises connectivity costs and eliminates the risk of relying on a 3rd party for radio connectivity.
Our self-contained sensors are simple to install and require minimal maintenance, operating for up to 3 years on a single set of 6 standard AA batteries.
Our innovative design allows us to offer a wide range of sensors at an extremely competitive price point, making it easy for users to expand their monitoring as needed.
Q: What is Ladybird IoT irrigation monitoring?
A: Farms often rely on irrigation staff to make time consuming manual checks on substrate moisture, leading to;
-
Inconsistency between team members and over time
-
Delayed decision making, increasing the time where the crop has the wrong conditions
-
Lack of records to allow teams to learn from their past actions and repeat their successes
-
Reduced quality and quantity of yield
Ladybird monitors substrate moisture, input water and runoff water frequently and consistently. The fast, accurate picture of conditions across the crop allows irrigation teams to focus on managing irrigation instead of collecting data
Q: What is Ladybird IoT climate monitoring?
A: Polytunnels and Glass are used to control climate, but many growers have very limited climate data due to the cost of sensors; decisions have to be taken on very limited data.
Surprisingly, significant temperature and humidity variation exist in covered crops, but a lack of visibility can lead to crops in some areas being grown in conditions which impact yield.
Forecasting yield volumes across the season is essential for crop marketing – Ladybird’s Growing Degree Hour tools help growers forecast crop volumes from week to week, leading to reduced losses and improved contract fulfilment.
Q: Do you have a user manual for the SM150-T?
A: Yes you can download a copy of the user manual by following the URL link below:
https://www.enviropro.co.uk/Docs/17031_1484819398204/preview/SM150T-user-manual.pdf
Q: Do you have a system integrator data sheet for the SM150-T?
A: Yes you can download a copy of the system integrator data sheet by following the URL link below:
https://www.enviropro.co.uk/Docs/17031_1484822482354/preview/SM150T-System-Integrator-Data-Sheet.pdf
Q: Do you have a catalogue of other sensors and accessories?
A: Yes there are other sensors manufactured by Delta T and you can view the soil moisture catalogue by following the URL link below:
https://www.enviropro.co.uk/Docs/17031_1663080164623/preview/Soil-moisture-measurement-catalogue.pdf
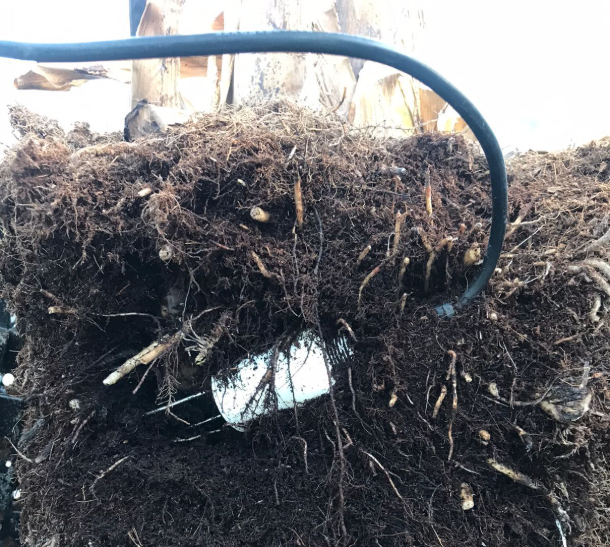
Q: I have an SM150-T soil sensor that is sending soil moisture readings well below 70% when the soil is 100% saturated
A: The sensor could be buried in the soil under a root ball of the plant and the soil around the sensor may have eroded away leaving the sensor proves open to air. The sensor probes need to be fully covered from the sharp tips to the base of the sensor in undisturbed soil with no part of the sensor probes open to air otherwise erroneous readings will be recorded by the Ladybird IoT.
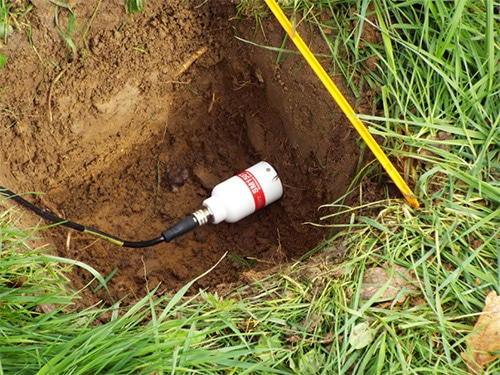
Good and Bad Examples of SM150-T Soil Sensor Location
|
|
|---|---|
|
|
Q: How can I check if my SM150-T sensor is reading correctly?
A: To address the issue with a suspected SM150-T soil sensor not reading correctly, let's go through the troubleshooting steps below and carry out a sensor check using an air and bucket test to confirm if the sensor is reading correctly or is possibly faulty.
Troubleshooting
-
Low Readings: Ensure the sensor rods are clean and free from debris. Check for any environmental factors that might affect the readings.
-
No Readings: Verify all connections are tight and ensure that the sensor is properly powered.
Low power sources to the sensor can affect the sensor reading and accuracy so check the Ladybird batteries are not depleted and if necessary try changing the battery for a new one. -
Defective Sensors: If a sensor is flagged as defective, it might need to be sent back for further investigation if it is truly faulty, but before we travel down that path, there are some checks that can be made yourself locally to see if the sensor is definitely faulty.
Air Test Procedure
-
Prepare the Sensor:
-
Ensure the sensor is clean and free from any soil or debris.
Dry the Sensor:
-
Dry the sensor thoroughly and leave to dry for while in a warm dry space.
-
-
Air Check - Sensor 0% Moisture Test:
-
Leave the sensor in the air and take readings.
The readings should be close to 0% since the sensor is not in contact with any moisture.
-
-
Bucket & Water Test Procedure
-
Prepare the Sensor:
-
Ensure the sensor is clean and free from any soil or debris.
-
Check the sensor's connections and cables for any signs of damage.
-
Make sure all connections are tight to maintain the IP68 integrity. A rating of IP68 means that a device is completely sealed against dust and that it can withstand complete and continuous submersion in water.
-
See FAQ Below: What is the best practice for tightening up a M12 cable to ensure a waterproof and secure connection ?
-
-
-
Hot Water Leak Test:
-
The hot water leak test – which involves submerging the sensor in a 60°C water bath or bucket for a fixed time whilst checking for bubbles emerging from the sensor or connector.
In terms of pressure, this test is comparable to an immersion in 1.4m depth of water.
-
-
Warm Water Sensor 100% Moisture Test:
-
Use a clean bucket and fill it with water. Ensure the water is at room temperature.
-
Submerge the sensor completely in the water. Make sure the sensor rods are fully immersed.
-
Leave the sensor in the water for a few minutes to allow the readings to stabilize.
-
-
Take note of the soil moisture readings. Ideally, the readings should be close to 100% since the sensor is submersed in water.
Bucket & Wet Sand Test Procedure
-
Prepare the Sensor:
-
Ensure the suspected faulty sensor is clean and free from any soil or debris.
-
-
Damp Sand Sensor Moisture Reading Test:
-
Use a clean bucket and fill it with dry sand.
-
Add room temperature water to the sand slowly and mixing it as you go. Add room temperature water until the sand is thoroughly wetted. Mix well to ensure even moisture distribution.
-
Insert the SM150-T sensor into the wetted sand, ensuring the sensor rods are fully covered.
-
Use a Delta-T hand-held meter (HH150 or HH2) available from Ladybird IoT, Multimeter, or the Ladybird system to measure the voltage output from the sensor.
-
Convert the Voltage:
-
Apply the formula to convert the voltage reading to moisture content.
For example, if the sensor reads 750mV, the moisture content is 75%.
-
-
-
To convert the sensor voltage from the SM150-T to permeable soil moisture content, you can use the following formula:
-
Moisture Content (%)=(Voltage (mV)1000)×100Moisture Content (%)=(1000Voltage (mV))×100
This formula converts the voltage reading (in millivolts) to a percentage of soil moisture content, assuming 0V corresponds to 0% moisture and 1000mV (1V) corresponds to 100% moisture.
Example Soil Permeability Calculation
Let's say you have a sensor reading of 750mV. Using the formula:
Moisture Content (%)=(750/1000)×100
Moisture Content (%)=0.75×100
Moisture Content (%)=75%
So, a reading of 750mV corresponds to 75% soil moisture content.
This method allows you to verify the sensor's accuracy and ensure it is providing correct moisture readings, which can be compared with a second spare SM150-T sensor and checked using a
Delta-T hand-held meter (HH150 or HH2) available from Ladybird IoT.

Calibration of the SM150-T sensor itself (is not possible)
Since the SM150-T soil sensor is an analogue sensor, calibration needs to be done within the Ladybird system itself by a trained Ladybird technician.
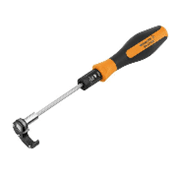
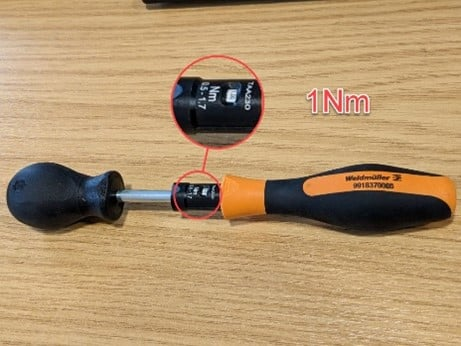
Q: What is the best practice for tightening up a M12 cable to ensure a waterproof and secure connection ?
A: Make sure all connections are tight to maintain the IP68 integrity. A rating of IP68 means that a device is completely sealed against dust and that it can withstand complete and continuous submersion in water.
-
Tighten the connector thumbscrews as much as you can by hand or use a torque driver set to 1Nm to be sure. See video:
-
We recommend the Weidmuller “1900021000” torque driver pictured below:
-
This will save lots of painstaking troubleshooting hours if you do have a loose connection and give you piece of mind that all connectors are correctly tightened.
-
Untightened connectors can come undone and let water into the cable which can damage wire cores and cause erroneous readings.
-
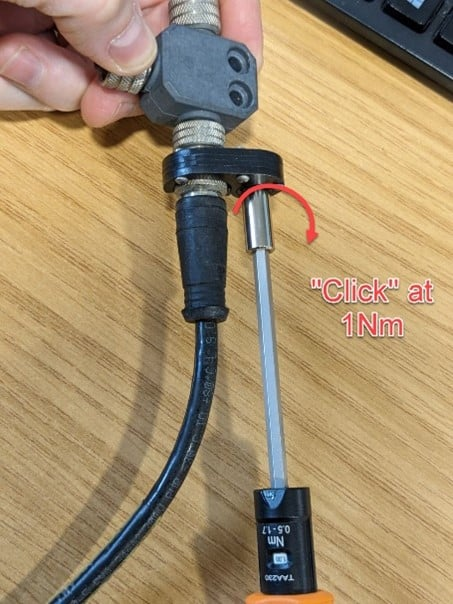
-
-
Connect in the office first and then transfer the Ladybird and SM150-T sensor to the field.
This way, you’re not trying to do it in unpleasant weather conditions and the time pressures are off.-
DON’T
Use duct tape. This will hold water against the connector. If tightened correctly, the connector will seal and hold. FAQ relevant to: SM150-T and WET150 Probes.
-
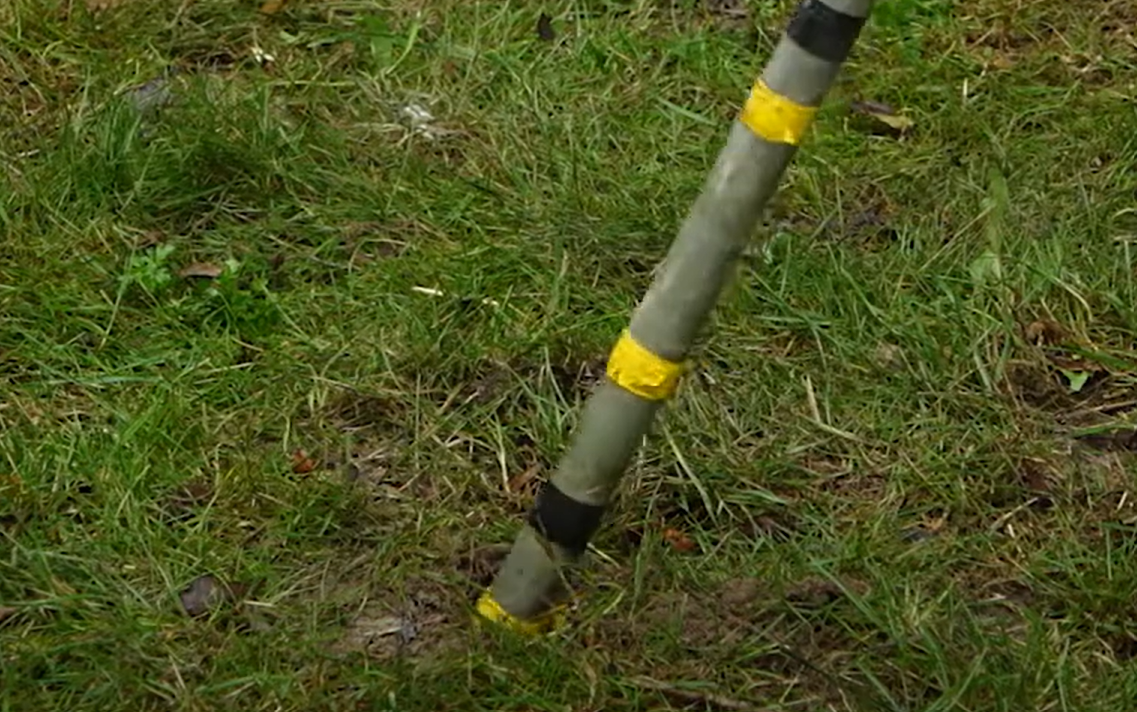
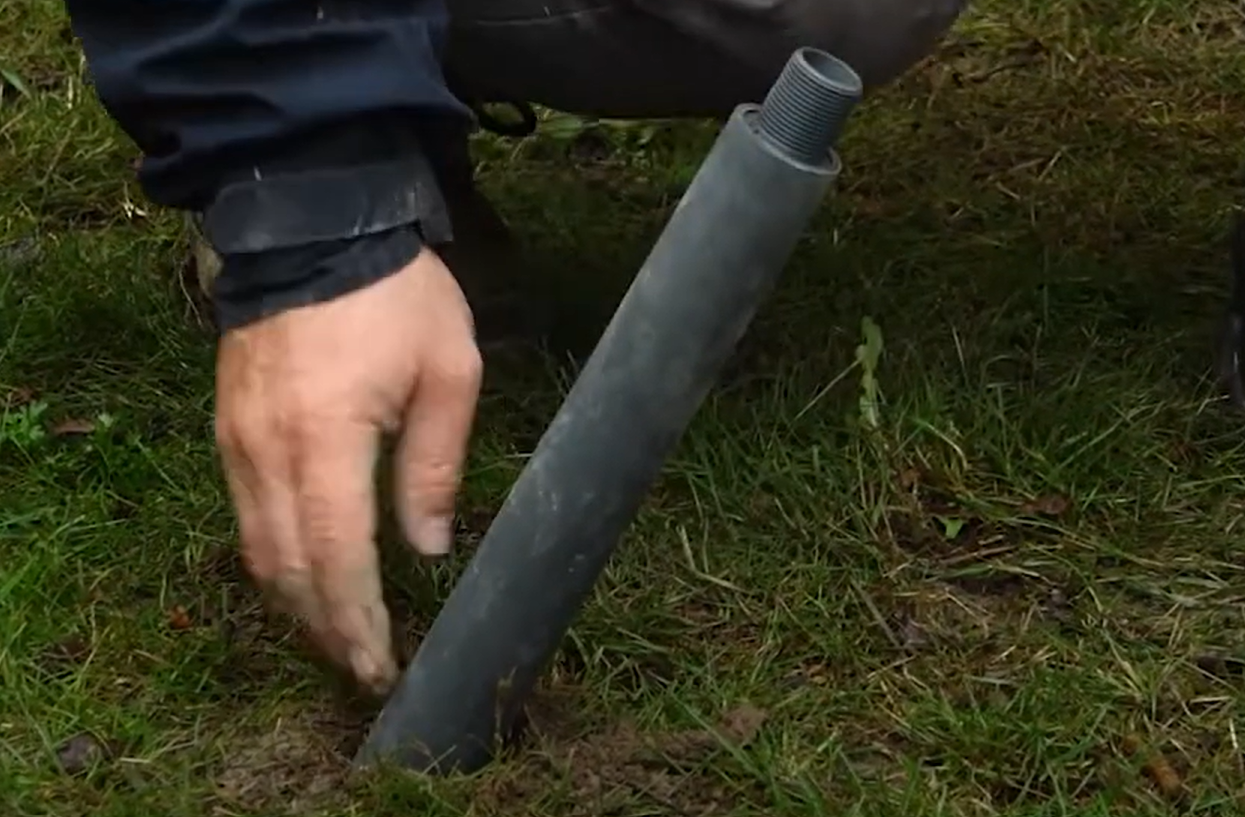
Q: How to install our SM150-T sensor into the soil under an existing plant, using an ML/EX100 100cm Extension Tube for SM150T and an auger, without disturbing the roots?
A: The Delta T ML/EX100 extension tube, is the best solution to achieve this without disturbing the root system, Feed the cable through the top of the tube and then connect to the SM150-T Sensor. The sensor has a thread which will allow it to be screwed on tightly to the extension tube as pictured below:
Advantages:
-
Easy to insert and remove from augured holes
-
Rapid attachment of extension tubes to the SM150-T sensor
-
Handy size for portable use
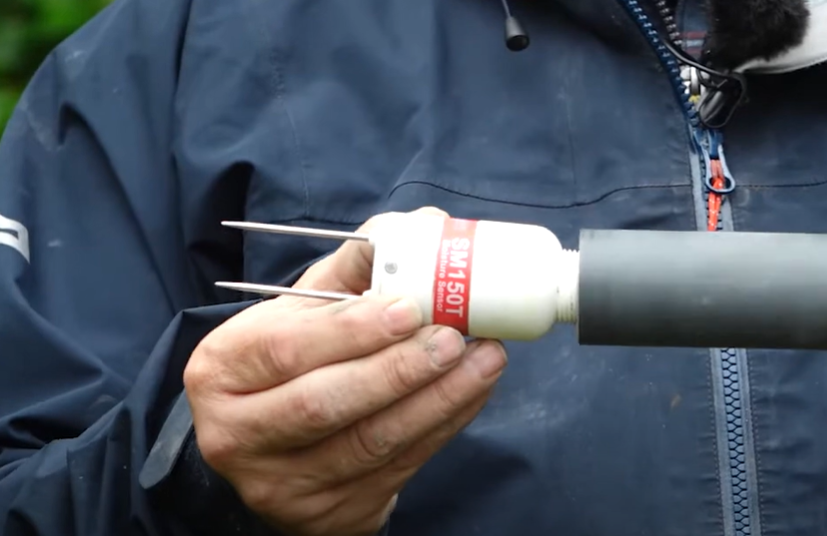
Using a manual auger or an auger that can fit into a battery drill chuck, drill into the ground at an angle and not vertically as sensors mounted vertically can be affected by saturation during heavy rain or watering and this can provide a false reading as to the moisture levels under the plant.
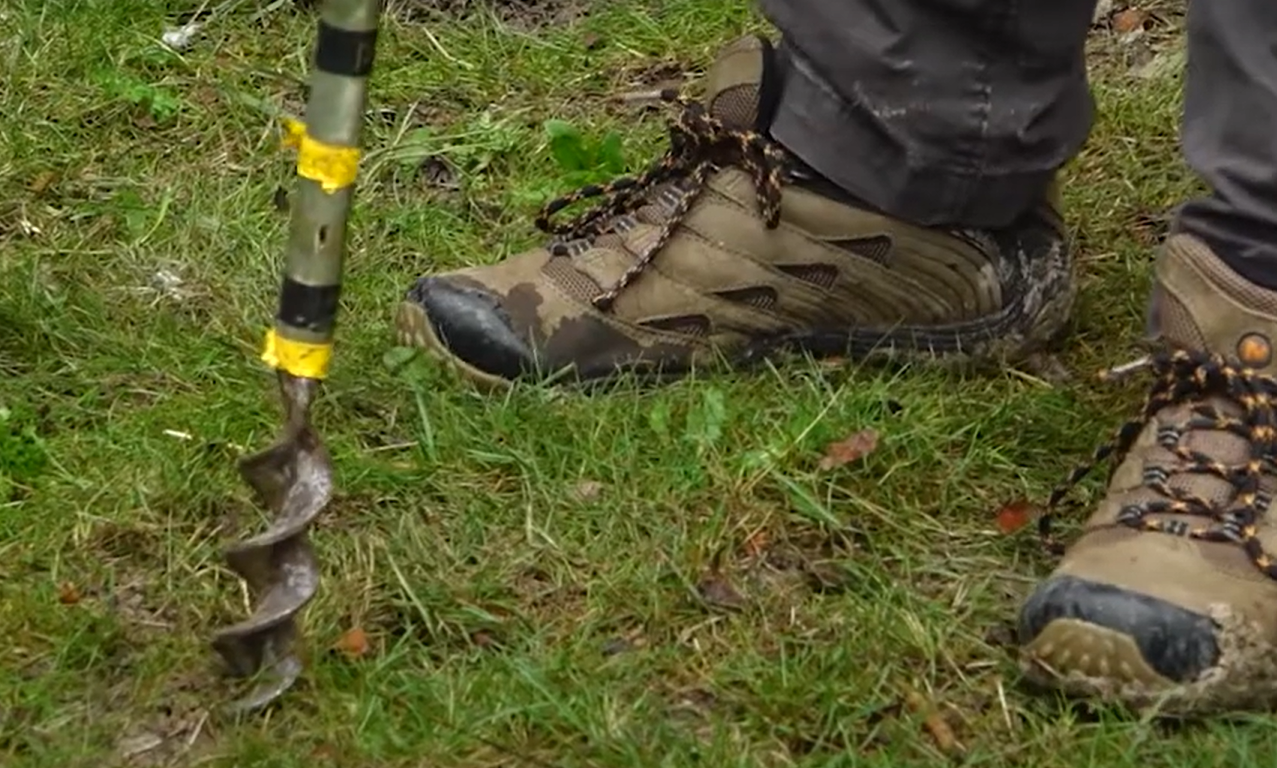
A: We can install an SM150-T sensor under an existing plant root system by manually drilling an augured hole at an angle.
-
Lets assume we want to install our sensor approximately 50cm below the plant and 30cm away from the stem but leaving approximately 30cm of the extension tube above ground (Extension tubes come in (0.5 and 1.0 m length and we are assuming the use of the 1m tube in this example), the tube has a 40 mm diameter body, with threaded end. Screw the sensor into this thread feeding the sensor cable through the inside of the tube. The tube Case can be sealed to IP68. So if you drill at an angle of 59.04 degrees. This angle ensures that the sensor extension tube will be exactly 50 cm below the centre of the plant and exactly 30 cm away from the stem, with approximately 30 cm of the tube remaining above ground.
-
the If you drill at an angle of say 50 degrees, then the sensor will be positioned 53.62 cm below the plant and 45.00 cm away from the stem. This means the sensor will be slightly deeper and farther from the stem than your original plan with 34.73 cm of the tube left above the ground.
-
Make sure to screw the sensor onto the tube nice and tight, now this allows you to insert the sensor down an augured hole. Give the extension tube a firm push into the ground to ensure that the sensor pins are pushed firmly into the undisturbed soil under the plant. Tighten the top cap around the cable to prevent water ingress down the inside of the tube.
-
Connect the other end of the cable to the Ladybird IoT gateway.
-
This method allows you to insert sensors under existing plants and also retrieve them easily if a sensor needs cleaning or checking for calibration against a known calibrated SM150-T sensor test kit like the HH150 available from Ladybird IoT.
EXTENSION TUBE ACCESSORIES

Q: How do I ensure that my SM150-T sensor is IP68 rated?
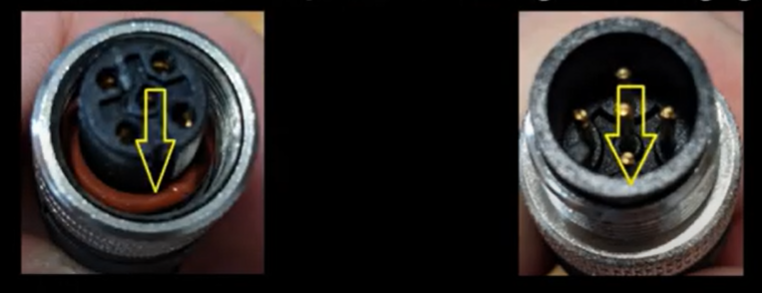
A: The M12 connectors pictured above need to be tightened to ensure they meet with IP68. The picture left shows an O-Ring and the picture right the O-Ring is missing. O-Rings can also perish over time so its good practice to check your buried sensors periodically and inspect the O-Ring for dirt build up or damage. If in doubt, replace the O-Ring
Q: How accurate and reliable is my SM150-T soil sensor?
A: The SM150T measures soil moisture and temperature with research-grade accuracy.
It offers stable, robust and reliable performance at an affordable price.
-
Dependable ± 3% soil moisture accuracy
-
Built-in temperature measurement
-
Robust and capable of being buried
-
5-year warranty* Subject to sensor registration online at Delta T
-
The SM150T can be logged by any Delta-T Devices datalogger and by many loggers from other manufacturers (simple 0-1 V output for moisture, 10K thermistor for temperature). To record temperature the sensor must be fully buried and connected to our Ladybird IoT Gateway.
Q: What is the best installation method for burial under existing plants?
A: For burial at depth the cylindrical shape facilitates installation in augured holes. The threaded base of the sensor can be connected to optional 50cm and 100cm extension tubes, which assist with placement and removal and minimise soil disturbance both around the plant root bowl and also preserve the original soil structure around the measurement rods. See a more detailed explanation above.
Q: Can you explain the different ports and sensors on the Ladybird?
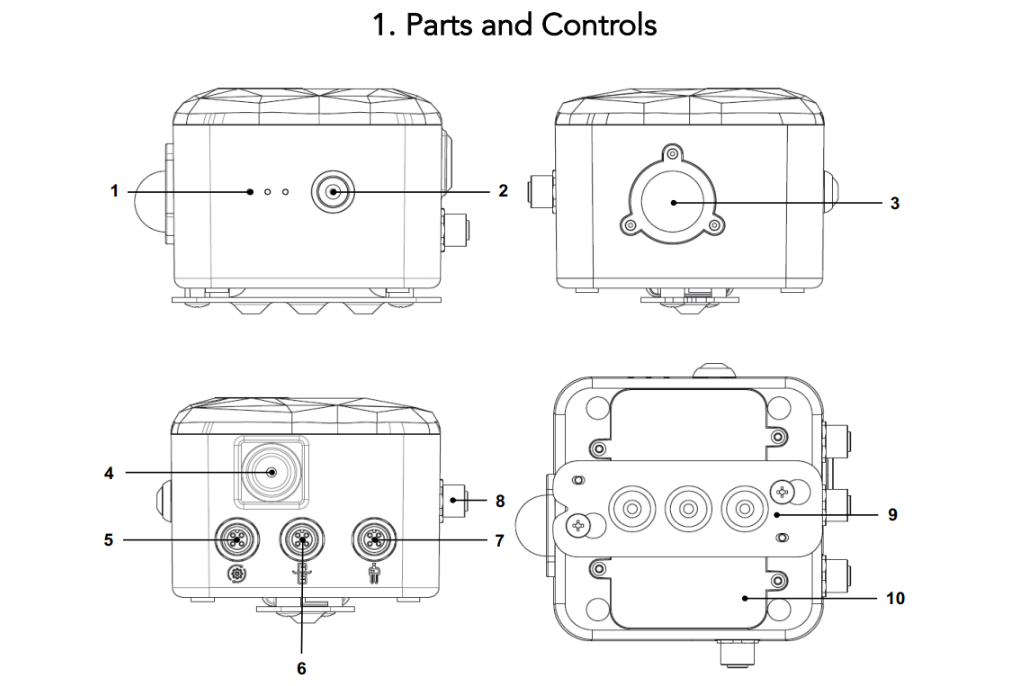
A: Ladybird IoT description of ports and built in sensors
-
LEDs (3)
-
On/Off Push Button
-
Light Intensity Sensor
-
Air Relative Humidity and Air Temperature Sensor
-
M12 Connector for Automation
-
M12 Connector for Water Level Transmitter
-
M12 Connector for Soil Probe
-
M12 Connector for Programming, Debug and Power.
-
Wall Mounting Plate
-
Battery Cover
Q: Are there any Ladybird Accessories?
A: The following Ladybird’s Accessories are sold separately:
-
Pole Mounting Plate
-
Soil Moisture and Temperature Probe SM150-T
-
Soil Sensor Buried Extension Tubes
-
Soil Probe cable with M12 5-pin Male-Female
-
Water Level Transmitter (includes cable and M12 3-pin Male connector)
-
Automation hook-up cable with M12 2-pin M connector
-
Cable Lengths can be specified up to 100 feet
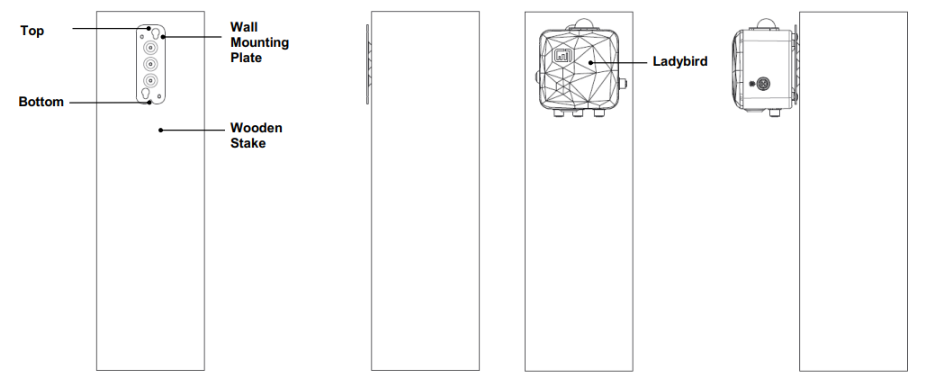
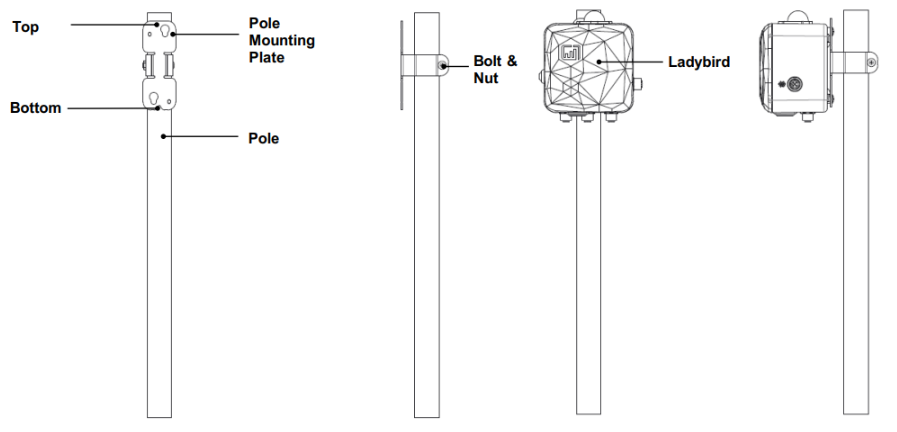
Q: How do you install the Ladybird?
A: Wooden Post or Wall Mount plate.
Fix the plate with three M3 screws on the wall (or any other appropriate wooden post or surface) and hang the device onto the plate as shown.
A: Pole Mounting plate.
Install and secure the Pole Mounting Plate onto the pole using the included bolt and screw nut and hang the Ladybird on the plate as shown below.
Q: The SM150T is reading voltages that are out of spec for Soil Moisture?
Q: Fabio reported that one of the issue we have seen with the SM150T is that we are reading voltages that are out of spec for Soil Moisture. We are reading over 2.5V (ending up also saturating our ladybird ADC), which is well above what it is supposed to be even at 100% moisture according to the system integrator data sheet.
A: Stephen Williams from Delta T Technical Support confirmed our initial suspicions in the following email extract:
-
Hi Paul,
Thanks for the email. 2.5v definitely sounds like a fault. -
You are spot-on to think about water ingress in the cables, we’ve had a few instances where people haven’t tightened the M12 connectors tightly enough and this has led to water ingress.
-
The easiest thing to test this is to use a handheld meter directly on the sensor and perform and air and water test. If it passes ok, then the cable has water in (or conductive deposits) and can be replaced.
-
If the sensor still reads 2.5v, then the most likely cause is a blown detector diode on the SM150T circuit board. This can be caused by nearby lightning strikes or an overvoltage of some description, pushing the diode beyond its limits.
-
We can replace the diodes but the cost involved is usually higher than replacing the sensor with a new discounted SM150T.
Q: How does Ladybird get its local weather data ?
A: We use Openweather for the weather data. They actually use several data sources and their proprietary Machine Learning to localise the weather to the specified coordinates (which for us would be the coordinates specified for each deployment location).
Q: Can I extract the coordinates of the different weather stations ?
A: See below Openweather’s explanation:
We utilize our proprietary hyperlocal ML-powered forecasting model with a resolution from 500 m to 2 km, globally. To offer global coverage and account for local nuances of climate, the OpenWeather Weather model (OWM) processes a number of datasets of different granularity, such as local and global models from national agencies such as radars, a vast network of weather stations, along with data from global/local providers such as NOAA, Environment Canada, Met Office and enhances its model with data from radars, weather stations and satellites.
You can find more about our approach here: https://openweather.co.uk/about .
You can find more about our accuracy here: https://openweathermap.org/accuracy-and-quality .
So it is not just a single weather station or weather source that provides you with the weather data, we can not export data from a single station as it is mixed in our algorithm along with other sources.
Q: Can Ladybird aggregate and collect weather data from other sources ?
A: If there were several requests and some strong commercial cases for potentially aggregating and collecting weather data from other sources, we can evaluate offering premium services that would go to that direction in the future.
Q: Question ?
A: Answer……
Q: Question ?
A: Answer……
Q: Question ?
A: Answer……
Q: Question ?
A: Answer……
Q: Question ?
A: Answer……
Q: Question ?
A: Answer……
Q: Question ?
A: Answer……
Q: Question ?
A: Answer……
Q: Question ?
A: Answer……
- Answer Approved